

Back in 2018, we had made a robot "Aspiradora: A Cleaning Robot" for which we won the best project award at the university. So, here we are giving you ideas about how to make "Aspiradora".
INTRODUCTION:
KATHMANDU: In 2016,
900 sweepers clean Kathmandu every day
but dust remains unsettled.
Therefore the usability of
Electric Road Cleaner machines have to come in practice to clean dusty roads.
This project is based on the “CLEAN NEPAL” theme that works on the
principle of suction of waste and it can be controlled by using smart-phones or
remote. Before entering this project I would like you to describe the basics of
electric vacuum suction road cleaner.
OBJECTIVE:
1) To make a well managed electric road cleaner
that is controllable through smart-phones.
2) Clean the dusty road without using sweepers
and broom.
Why the device is important in the context of Nepal?
As we all
are familiar with the background and condition of roadways in our valley. We
know that many governmental constructions are being carried out for the
development of Nepal but due to some ineffective approach, the roads nowadays
are full of dust and unmanaged left out. So to minimize some issues regarding
environmental health and situation we have made this device that is easy to
handle and portable, can be accessible to a larger area if used effectively.
Device exploration in great event AVISHKAR 18:
There were many presenters from renowned universities like TU, PU, and KU. We, the first year/first semester group of 6-students made this project and presented it for 2 days in Robot Demonstration Section at Kathmandu University. And we stood for the first position, first prize with the immense support of audiences participated and viewers and a merit vote conducted by the organizers and judges and made to win the title and the winning prize of NRs. 10,000.
You
can make your own Aspiradora by following given methods:
Step 1: Construction of vacuum suction.
1. Take an ordinary bottle of 1.25L and cut it into
three pieces.
2. Adjust a fan with a motor attached to the base
piece of the bottle.
3 Keep the middle part of the bottle as it is and
fit the upper piece to the suction pipe.
4. Power the fan with 5V supply, it rotates in the clockwise direction. The positive suction is created resulting in the dust
particles sucked into the bottle. Similarly, the anticlockwise rotation of the fan
is used for the outlet of dust particles.
Step 2: Frame of the Aspiradora
2. Connect the motors of four wheels to the motor
driver.
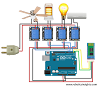
Step 3: Connect the whole setup to Arduino UNO with a Bluetooth device and control the system by a smartphone
- Arduino UNO
- DC Motor
- L298N Motor Driver
- HC05 Bluetooth control

Step 4: Programming section
- Forward button: 1
- Backward button: 2
- Left button: 3
- Right button: 4
- Stop button: 5

In this way, you can successfully make and operate Aspiradora. If you have any queries about this project, you can contact us at nasaelectronics@gmail.com. We will be glad to help you.


1 Comments
Woori Casino: Welcome Bonus & Games - Paddy Power
ReplyDeleteWelcome to our 메리트 카지노 조작 World's Biggest 우리 카지노 40 프로 총판 모집 Online Casino 샌즈 카지노 먹튀 with the BIGGEST LIVE Dealer Games, Slots, 더킹카지노 회원가입 Roulette & Live Casino Table Games Available to Play! 슈어 벳 Play Here!
If you have any doubts, Please let us know.