

The dual bidirectional motor driver is based on the L298N Dual H-Bridge Motor Driver IC. This motor driver will allow you to easily and independently control motors up to the current flow of 2A inside the motor driver output terminal. Beyond the flow of 2A current will make motor driver heated resulting in damage to the motor driver.
For this project you will need:
- Arduino UNO
- 4x DC motors
- Breadboard
- L298N Motor Driver Module
So let's get started:
Knowing the motor driver from the figure below:
 |
| Fig1: Pin diagram of a motor driver |
Note: Do the below setup of the figure only after uploading code to Arduino because Arduino always stores and run the previously uploaded code that may cause a short-circuit.
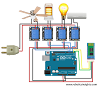
 |
| fig2: Connection between Arduino and Motor driver |
Now, let's code our Arduino to control the motor driver.
Here is the code:
int motor1=8;
int motor2=7;
int motor3=6;
int motor4=5;
void setup()
{
pinMode(motor1,OUTPUT);
pinMode(motor2,OUTPUT);
pinMode(motor3,OUTPUT);
pinMode(motor4,OUTPUT);
}
void forward()
{
digitalWrite(motor1,HIGH);
digitalWrite(motor2,LOW);
digitalWrite(motor3,HIGH);
digitalWrite(motor4,LOW);
}
void backward()
{
digitalWrite(motor1,LOW);
digitalWrite(motor2,HIGH);
digitalWrite(motor3,LOW);
digitalWrite(motor4,HIGH);
}
void left()
{
digitalWrite(motor1,LOW);
digitalWrite(motor2,HIGH);
digitalWrite(motor3,HIGH);
digitalWrite(motor4,LOW);
}
void right()
{
digitalWrite(motor1,HIGH);
digitalWrite(motor2,LOW);
digitalWrite(motor3,LOW);
digitalWrite(motor4,HIGH);
}
void stop()
{
digitalWrite(motor1,LOW);
digitalWrite(motor2,LOW);
digitalWrite(motor3,LOW);
digitalWrite(motor4,LOW);
}
void loop()
{
forward();
delay(2000);
backward();
delay(5000);
left();
delay(3000);
right();
delay(4000);
stop();
delay(7000);
}
You can make changes to the above-written code and make your own modifications.
Let's understand the code:
- Motor driver and Arduino pin will be configured as:
IN1 - Arduino pin 8
- int motor1=8;
int motor2=7;
int motor3=6;
int motor4=5;
This is just a declaration of Arduino pins, these pins are equivalent to the pin of motor driver. i.e.
IN1=PIN8.....IN1=OUT1
IN2=PIN7.....IN2=OUT2
IN3=PIN6.....IN3=OUT3IN4=PIN5...IN4=OUT4
- Void forward(){digitalWrite(motor1,HIGH); // OUT 1 = 9 voltdigitalWrite(motor2,LOW); //OUT 2 =0 voltdigitalWrite(motor3,HIGH); //OUT 3= 9 voltdigitalWrite(motor4,LOW); // OUT 4 = 0 volt}
Since OUT 1 gets 9 volt and OUT 2 gets 0 volts this will create a potential difference between motors and will make motor i.e. Motor 1 and Motor 2 operate in a clockwise direction. Similarly for OUT 3 and OUT 4 in clockwise operate for Motor 3 and Motor 4.
- void left(){digitalWrite(motor1,LOW); // OUT 1 = 0 voltdigitalWrite(motor2,HIGH); // OUT 2 = 9 voltdigitalWrite(motor3,HIGH); // OUT 3 = 9 voltdigitalWrite(motor4,LOW); // OUT 4= 0 volt}
Since OUT1 gets 0 volts and OUT2 gets 9 volts this will create a potential difference between motors and will make motors i.e. Motor1 and Motor2 operate in an anti-clockwise direction. Similarly, OUT3 gets 9 volts and OUT2 gets 0 volts this will create a potential difference between motors and will make motors i.e. Motor1 and Motor2 operate in a clockwise direction.
similarly, we can think how void backward(), void right() and void left() will work.
- Void forward(), void backward(), void left(), void right(), void stop()....these are functions that we will call from void loop. These functions help motor1, motor2, motor3 and motor4 to operate in particular direction.
- Inside void loop()
delay(2000);
This will move motors in forward direction for 2 seconds i.e.2000 mili seconds. It means void loop() will call void forward() for 2 seconds.Similarly, for backward(); delay(5000); will turn motors in left direction for 5 seconds and so on for right(); backward(); and stop();
Let's understand the mechanical part:
- Connect jumpers in ENA and ENB as shown in fig2.
- Here turning is always zero turns i.e. If we make a DIY car from the above configuration of motors then for left turn the car will rotate left at the same position resulting in zero turns. Motor 1 and Motor 2 will turn in an anti-clockwise direction and Motor 3 and Motor 4 will turn in clockwise direction resulting into zero turn
- Note that Motor1 and Motor2 are connected to the same pin in OUT1 and OUT2 respectively. So there the direction of rotation will be the same. Similarly, Motor3 and Motor4's direction of rotation will be the same.
Hence, you can control a motor driver with Arduino. If you have any queries regarding this topic you can contact us at nasaelectronics157@gmail.com


0 Comments
If you have any doubts, Please let us know.