


Are we really worried about our home electrical bill due to the unnecessary consumption of electricity by fan, here is the best solution to it. Often in summer days, we use a fan to make our room temperature falls to 25-26 degree celsius i.e. normal room temperature. during the night the temperature falls still the fan is open and we feel cold and at the same time, there is a waste of energy as well. So, in this tutorial we are going to make an automatic fan that will maintain it's room temperature i.e, open the fan while room temperature exceeds 26-degree Celcius and close the fan while room temperature is below 26-degree celsius. Let's make our own automation of the fan.
Components required:
1. Arduino UNO
2. 5 Volt Relay Module 220V
3. LM35 Temperature Sensor
About Relay:

About lm35 temperature sensor:

lm35 is a temperature sensor that has 3 pin configuration, Vcc, Vout, Gnd. To Vcc, we supply 5 volts and Gnd is grounded. Whenever the sensor receives fluctuation in temperature, it gives it's reading in voltage form from Vout. This variation type of output we measure from the Arduino analog pin and convert it into respective temperature in degree celsius by using the formula given below:
Temperature = Analog read * 0.48828125
Programming Section:
NOTE: We first upload our program to Arduino then only we do the connections because after connection and then uploading the program may cause a short circuit due to previously uploaded programs.
float sensor=A0;
float temp=0;
int fan=1;
void setup() {
Serial.begin(9600);
pinMode(fan,OUTPUT);
digitalWrite(fan,LOW);
}
void loop() {
temp=analogRead(sensor);
temp=temp*0.48828125; // convert temp to degree celsius
if (temp>26)
digitalWrite(fan,HIGH);
else
digitalWrite (fan,LOW);
}
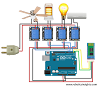
Circuit Connection:

Make the circuit connection as above and now you are ready to go with your new featured fan.
In this way, you can make your own fan automation, and accordingly, you can set the temperature value for on and off of your device.


5 Comments
in this project what type of communication is doing arduino?
ReplyDeleteIt is a voltage sensing type of communication done by arduino
Deletemy fan is turning on but not turning off when I set the tempreture low
ReplyDeleteThis comment has been removed by the author.
DeleteJAY PRAKASH MANDAL
Delete30 May 2023 at 09:00
See the temperature value in serial monitor and then take decision when temperature is low
If you have any doubts, Please let us know.